
Skull mounts are usually known as European Mounts,
western skull mounts, or western mounts. They are known to as European
mounts because to keep the skin and hair on the animal is very expensive
in Europe; there are very less taxidermists who can obtain imported materials
from America. They are a huge portion of taxidermy work.
Only the skull of the animal is displayed, which will have horns, antlers,
or nothing attached to the skull dependent on the animal. These Euro mounts can
be presented however the individual would like.
The old-style technique of eliminating muscle and other flesh
tissue leaving only the clean skull is boiling the entire head of the animal in
water. This technique was the first of all to be used in skull mounting,
it is not expensive thus it saves money and can produce results in a day or less
than a day, it can be done easily with few materials that can be found in any
grocery or general supplies store. The Euro mount does not take up much space
because of the absence of neck and else.
As Euro Mount are rising in popularity these days and becoming trendy,
everyone (including me & u) would definitely love to have a one for there
room and besides that you can make a Euro Mount at your home cause it’s not as
difficult as it might sounds.
In this article I’m going to guide you step by step to make a
Euro mount at home easily with a little or no effort at all, all you got to do
is follow the steps below.
Let’s begin with the steps…
Step 1:
Removing the Skin from the Skull

Start with peeling off the skin from the skull, after peeling
the face and ears of try to cut the large chunks of meat as well (remove eyes &
brain if possible).
Step 2:
Boiling the Skull in Hot Water (salt water).
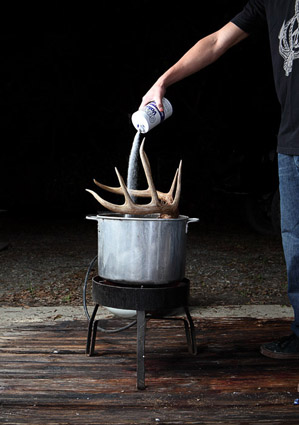
Now boil the skull in hot water especially salty water is recommended
for this process, try to keep the antlers out of water and adjust the water
level not to rise above the bases. Keep an hourly check on the skull and scrape
off the meat from bone as soon as it tends to loosen up.
Step 3: Cleaning
the Skull.

Now remove any remaining bits of flesh with small needles/nose
pliers and small sharp tools. The skull should be boiled and fully cleaned till
now (if not then use numerous scrapping tools and brushes to do so) after this
gently power wash the skull this will remove crevices and nooks that tools can’t
without breaking the bone or cartilage.
Step 4: Drying
of the Skull

Let the skull dry overnight or full day in sunshine.
Step 5:
Bleaching the Skull.

If you want a shiny white Euro mount just like a one from taxidermist
then bleach the skull with peroxide bleach. This process can take a bit of time
depending upon the freshness of the skull till then you can hang the skull with
a mounting device.
Step 6: Finishing
off with the Euro Mount.

After the skull has been dried, spray it with a fine coat of “Satin
Poly” on the skull to seal and protect from dirt and dust. Your Euro Mount is
ready to display at your room.
Well that’s all about how to make a Euro mount at home. If you found this article helpful please
subscribe our blog to never miss a post.
Don’t forget to tell us your reviews in the comments below.
Don’t forget to tell us your reviews in the comments below.


0 comments:
Post a Comment